vue3 使用指南
组合式 API(setup)
setup 选项在组件创建之前执行,一旦 props 被解析,就将作为组合式 API 的入口。
在组件创建之前执行
由于 setup 在组件创建之前执行,所以我们在 setup 里面使用不了 this。这是因为 setup 执行的时候 vue 实例还没创建完毕(setup 运行围绕着 beforeCreate 和 created 生命周期钩子),所以 vue 并没有给 setup 绑定 this 的指向自身。
所以想在 setup 中定义双向绑定的变量、定义生命周期等操作都得借助引入外部函数来实现。
setup 使用方式
setup 函数
直接 vue2 使用方式上添加一个 setup 函数
export default {
  props: {
    title: String,
  },
  setup(props, content) {
    console.log(props.title);
  },
};
该方式 setup 接受两个参数。
- props:通过 props 可以获得组件传过来的值
- content: context 是一个普通 JavaScript 对象,暴露了其它可能在 setup 中有用的值
单文件组件方式
像引入 js 文件方式一样,在里面可以直接书写 setup 相关代码。
<script setup></script>优点:可以直接省略 return 和 components 的书写
创建响应式数据
ref
ref 函数仅能监听基本类型的变化,不能监听复杂类型的变化(比如对象、数组)
const count = ref(0);ref 对象仅有一个 .value property,指向该内部值。
console.log(count.value); // 0

count.value++;
console.log(count.value); // 1
如果将对象分配为 ref 值,则它将被 reactive 函数处理为深层的响应式对象。
reactive
复杂类型则使用 reactive 创建响应式数据
const obj = reactive({ count: 0 });操作里面的值则不需要想 ref 那样使用 value
console.log(obj.count); // 0TIP
ref 可以定义复杂数据类型的和简单数据类型的,但是 reactive 只能定义复杂数据类型,之所以 ref 可以定义复杂数据类型是因为 ref 里面有一个判断,当他不是简单数据类型的时候就会走 reactive 的这个来定义,而 reactive 里面是没有这个判断的
使用生命周期
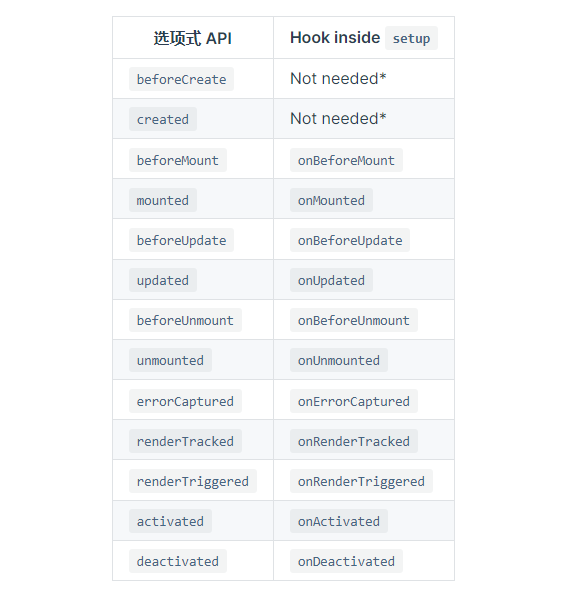
想在组合 API 中使用生命周期,必需先引入生命周期函数。
import { onMounted } from "vue";

export default {
  setup() {
    onMounted(() => {
      console.log("Component is mounted!");
    });
  },
};
可以看到相对于 vue2 的 mounted 命名多了一个 on。是的,在组合式 API 中所用生命周期命名前面都多了一个 on。但是 beforeCreate 和 created 除外,因为组合式 API 就是围绕他俩运行的,所以在组合式 API 中并不支持这两个生命周期。
组件交互
defineProps
在组合式 API 中,通过 defineProps 来定义 props
import { defineProps } from "vue";

const props = defineProps({
  name: {
    type: String,
    required: true,
  },
});

props.name;
defineEmits
在组合式 API 中,通过 defineEmits 来定义 emit
const emit = defineEmits(["closeDialog"]);
emit("closeDialog");
defineExpose
子组件对外暴露自己参数
import { defineExpose } from "vue";
const dialogVisible = ref(false);

defineExpose({ dialogVisible });
获取 DOM
首先跟 vue2 一样,先在 dom 上定义 ref 名称。
<div ref="domRef"></div>由于 setup 中不存在 this 指向实例,所以需要通过 ref 来创建一个变量指向 dom。
let domRef = ref(null);需要注意两个点:
- 变量名字必须跟 dom 上定义 ref 的名字一致
- 定义的值建议为 null
- 如果是函数书写方式,则需要 return 出去
computed 和 watch
computed
需要手动接收 computed 之后的参数
import { computed, ref } from "vue";

let num = ref(1);
let count = computed(() => num.value + 1);
watch
- 基本用法
import { ref, watch } from "vue";
const count = ref(0);
watch(count, (newValue, oldValue) => {
  console.log(newValue, oldValue);
});- 监听对象中的某个属性
import { reactive, watch } from "vue";
const obj = reactive({
  info: "中国",
  msg: "加纳",
});

// 监听对象中的某一个属性的时候watch里面要使用箭头函数指向对象中的属性
watch(
  () => obj.info,
  (newValue, oldValue) => {
    console.log(newValue, oldValue);
  }
);
组件二次封装技巧
attrs
透传 Attributes 是指由父组件传入,且没有被子组件声明为 props 或是组件自定义事件的 attributes 和事件处理函数。
import { useAttrs } from "vue";
const attrs = useAttrs();
通常用在二次开发中继承原先 UI 组件的属性和事件
<el-button v-bind="attrs || {}"></el-button>slots
由父组件传入的 slot ,在组合式 api 中可以使用 useSlots 来获取
import { useSlots } from "vue";
const slots = useSlots();
如果 slot 过多,并且是透传到给下一个组件的情况下,可以循环输出
<template v-for="(value, key) in slots" :key="key" #[key]>
  <slot :name="key"></slot>
</template>
对象 key 即是插槽名称,如果想要一个作用域插槽
<template v-for="(value, key) in slots" :key="key" #[key]="scope">
  <slot :name="key" v-bind="scope"></slot>
</template>
继承第三方 Methods
const table = ref(null); // 绑定 dom
const expose = {};

onMounted(() => {
  const entries = Object.entries(table.value);
  for (const [method, fn] of entries) {
    expose[method] = fn;
  }
});
defineExpose(expose);
vue3 技巧
使用 computed 拦截 v-model
当父组件向子组件传递一个 v-model 的值时
// 子组件
const props = defineProps({
  modelValue: {
    type: modelValue,
    default: () => {
      return {
        count: 1,
        str: "111",
      };
    },
  },
});
而这个值,子组件也需要用组件 v-model 绑定值
<el-input v-model="modelValue.count" style="width: 240px" />这时候往往我们的做法是重新克隆 modelValue 这个值,然后再使用。但是现在我们可以使用 computed 来解决
const emit = defineEmits(["update:modelValue"]);
const model = computed({
  get() {
    const proxy = new Proxy(props.modelValue, {
      get(target, key) {
        return Reflect.get(target, key);
      },
      set(target, key, value) {
        emit("update:modelValue", {
          ...target,
          [key]: value,
        });
        return true;
      },
    });
    return proxy;
  },
});
这样,在 html 中则是直接使用 model
<el-input v-model="model.count" style="width: 240px" />这样就可以完美实现这个需求了。而且最主要的是我么可以提成 hooks
import { computed } from "vue";

export function useVModel(props, propName, emit) {
  const model = computed({
    get() {
      const proxy = new Proxy(props[propName], {
        get(target, key) {
          return Reflect.get(target, key);
        },
        set(target, key, value) {
          emit(`update:${propName}`, {
            ...target,
            [key]: value,
          });
          return true;
        },
      });
      return proxy;
    },
  });
}
当然在 vue3.4 以上提供了 defineModel
// 声明 "modelValue" prop,由父组件通过 v-model 使用
const model = defineModel();

// 在被修改时,触发 "update:modelValue" 事件
model.value = "hello";